Lateral Ankle Sprain: Expert Physiotherapy & Recovery
- Recovery timeline: Grade I 1-2 weeks · Grade II 3-6 weeks · Grade III 6-12 weeks — driven by functional criteria, not calendar days
- Move early, don't immobilise: functional treatment returns you to activity 7 days faster with better range of motion at 3 months, no rise in re-injury (Kerkhoffs et al., Cochrane 2012)
- Why rehab matters: 40% of lateral sprains become Chronic Ankle Instability if undertreated (Gribble et al., 2016); neuromuscular training cuts recurrence by 52%, and 8 weeks of proprioceptive work reduced repeat sprains 35% over 12 months (Hupperets et al., BMJ 2009)
- Return-to-sport criteria: single-leg calf raise ≥20 reps · pain <2/10 with hopping · 90% strength symmetry vs uninjured side
- Cost: Flat ₪400 per 50-60 min 1:1 session, no deposit
- Clinic: ★5.0 across 131 verified reviews · Alejandro Zubrisky BPT, MoH license 10-120163 · Yaakov Apter 9, Tel Aviv
The ankle is the most commonly injured joint in sport and daily life. Lateral ankle sprains account for approximately 40% of all sports injuries and 15-25% of all emergency room visits for ankle injuries. Yet most people never receive proper rehabilitation. We'll guide you through the science of ankle recovery—from immediate care through return-to-sport—using evidence-based protocols.
Does Mobilisation with Movement (MWM) Help Ankle Sprain Recovery?
Cruz-Díaz (Disabil Rehabil 2015) and Nguyen (J Man Manip Ther 2021) show talocrural mobilization with movement improves dorsiflexion ROM, dynamic balance and self-reported instability in acute and chronic ankle sprain. See Mulligan Concept / MWM.
What Is a Lateral Ankle Sprain?
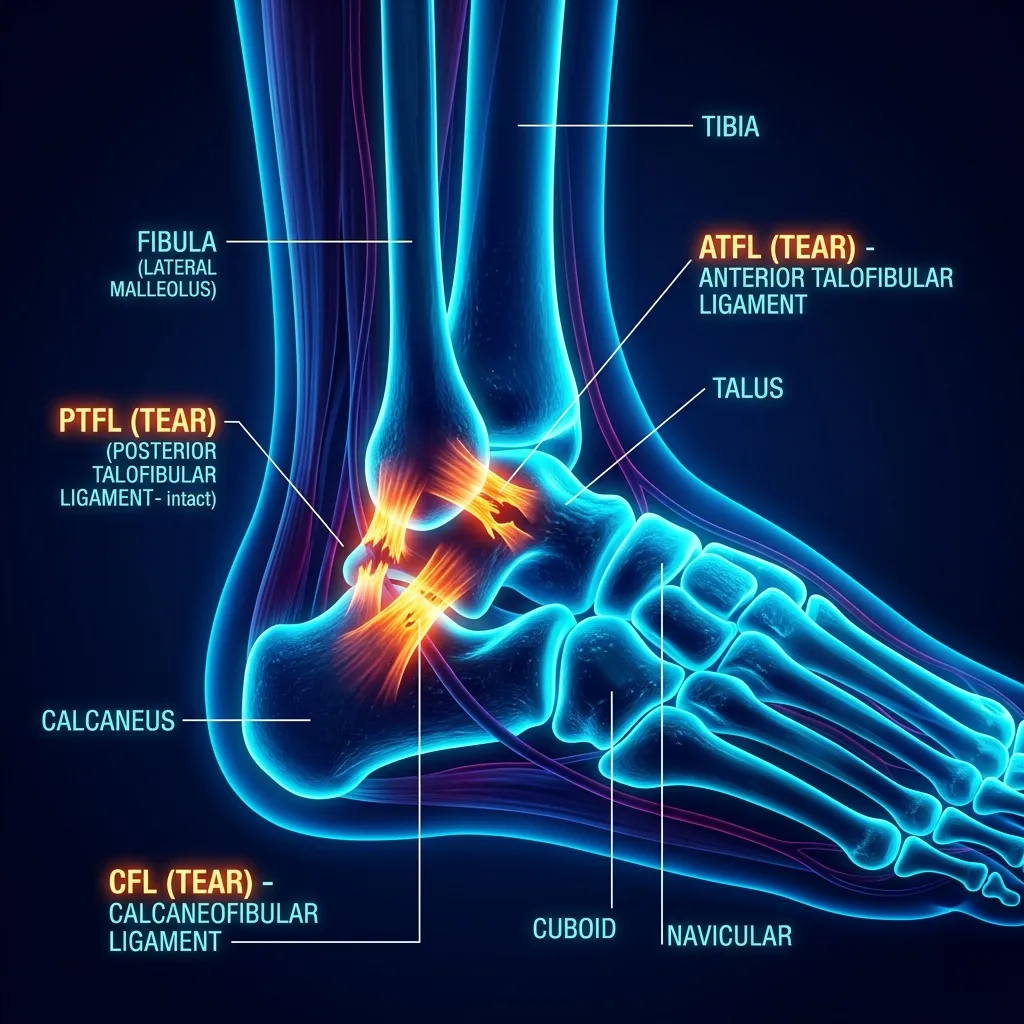
In plain language: A lateral ankle sprain injures the ligaments on the outside of the ankle, most often the Anterior Talofibular Ligament (ATFL). The usual mechanism is inversion combined with plantarflexion when you step on an uneven surface, land awkwardly, or cut sideways. It is the most frequent lower-limb sports injury, and a previous sprain is the greatest predictor of re-injury.
A lateral ankle sprain involves injury to the ligaments on the outside (lateral side) of the ankle. The ankle joint is stabilised by three main ligaments: the Anterior Talofibular Ligament (ATFL), which is the primary restraint to inversion and the most commonly injured; the Calcaneofibular Ligament (CFL), which provides stability during dorsiflexion and plantarflexion movements; and the Posterior Talofibular Ligament (PTFL), which resists posterior translation of the talus.
The typical mechanism of injury is inversion combined with plantarflexion—commonly seen when stepping on an uneven surface, landing awkwardly from a jump, or cutting sideways during sport. The sudden stretch places enormous stress on the ATFL, which can tear partially (Grade II) or completely (Grade III).
Why Ankle Sprains Are So Common
Epidemiologically, the incidence of ankle sprain is approximately 1 per 10,000 people per day in the general population, making it the most frequent lower-limb sports injury. Risk factors include previous ankle sprain (greatest predictor of re-injury), sport participation (basketball and soccer have highest rates), and neuromuscular deficits such as poor proprioception or peroneal muscle weakness.
How Severe Is My Ankle Sprain? Grades I, II and III Explained
In plain language: Ankle sprains are graded by ligament damage. Grade I is microscopic ATFL tearing with minimal swelling and 1 to 2 weeks of recovery. Grade II is partial tearing of the ATFL and CFL with moderate swelling and 3 to 6 weeks. Grade III is a complete rupture, often unable to bear weight, taking 6 to 12 weeks and possibly surgical evaluation.
Ankle sprains are classified into three grades based on the extent of ligamentous damage, clinical presentation, and functional limitations. Understanding your grade is essential for determining the appropriate rehabilitation timeline and intensity.
| Grade | Ligament damage | Pain at rest | Recovery |
|---|---|---|---|
| Grade I (mild) | Microscopic ATFL tears, no complete disruption; weight-bearing possible. | 4/10 | 1–2 weeks functional rehab |
| Grade II (moderate) | Partial tears of both ATFL and CFL; mild instability on Anterior Drawer. | 6–7/10 | 3–6 weeks structured rehab |
| Grade III (severe) | Complete ATFL + CFL rupture, often PTFL; unable to bear weight. | 8–10/10 | 6–12 weeks; consider surgical evaluation |
Mild
Ligament damage: Microscopic tears to the ATFL without complete disruption.
- Minimal swelling and bruising
- Weight-bearing immediately possible
- No instability on clinical tests
- Pain 4/10 at rest
- Recovery: 1-2 weeks functional rehab
Moderate
Ligament damage: Partial tears of both ATFL and CFL.
- Moderate swelling and bruising
- Painful weight-bearing (supportive device helpful)
- Mild instability on Anterior Drawer Test
- Pain 6-7/10 at rest
- Recovery: 3-6 weeks structured rehab
Severe
Ligament damage: Complete rupture of ATFL + CFL, often with PTFL involvement.
- Significant swelling and deep bruising
- Unable to bear weight immediately
- Positive Anterior Drawer (>5mm) + Talar Tilt
- Pain 8-10/10 at rest
- Recovery: 6-12 weeks; consider surgical evaluation
Clinical Testing for Diagnosis
After acute swelling subsides (usually 4-5 days), your physiotherapist will perform specific tests to grade the sprain. The Anterior Drawer Test assesses ATFL integrity by pulling the foot forward; a positive test (abnormal forward movement) suggests ATFL disruption. Sensitivity is 85% and specificity 75% for Grade III sprains when performed at 4-5 days post-injury. The Talar Tilt Test evaluates CFL function by inverting the foot; excessive inversion suggests CFL damage.
The Ottawa Ankle Rules help determine if X-rays are necessary. These rules state that an X-ray is only needed if there is pain in the posterior third of the lateral or medial malleolus and any swelling/inability to bear weight immediately after injury. This rule has 100% sensitivity for detecting fractures while reducing unnecessary imaging by 36% (Stiell et al., JAMA 1994; n=1,032 patients).
What Should You Do Immediately After an Ankle Sprain?
In plain language: The older RICE approach has been replaced by POLICE: Protection, Optimal Loading, Ice, Compression, Elevation. The key change is optimal loading, movement as tolerated from day 1 rather than complete rest. Functional treatment returns people to activity about 7 days faster and gives better ankle range of motion at 3 months, with no increase in re-injury rates.
The traditional RICE protocol (Rest, Ice, Compression, Elevation) has been updated to POLICE (Protection, Optimal Loading, Ice, Compression, Elevation), reflecting current evidence on the importance of early movement and functional loading.
Protection (Days 1-3)
For Grade I sprains, protection may involve an elastic bandage or soft ankle sleeve. For Grade II-III, a semi-rigid brace or ankle tape provides mechanical support while allowing gentle motion. Do not immobilise completely—full immobilisation delays recovery and increases stiffness.
Optimal Loading (Days 1-Ongoing)
This is the paradigm shift in ankle sprain management. Movement as tolerated is superior to complete rest. Early controlled loading stimulates tissue healing, maintains proprioception, and accelerates functional recovery. Research (Kerkhoffs et al., Cochrane 2012; CD000380) comparing functional treatment to immobilisation found that functional rehabilitation allowed return to activity 7 days faster and resulted in better ankle range of motion at 3 months, with no increase in re-injury rates. Starting day 1-2, perform pain-free range of motion exercises (alphabet exercises with your foot, gentle ankle circles), activate peroneal muscles with isometric contractions, and progress to weight-bearing as tolerated.
Ice (First 48-72 Hours)
Apply ice for 15-20 minutes every 2 hours during the acute phase. Ice reduces pain and oedema by decreasing metabolic demand and blood flow to the injured tissue. After 48-72 hours, heat can be introduced to promote blood flow during rehabilitation.
Compression
An elastic bandage, ankle sleeve, or compression wrap reduces swelling by limiting fluid accumulation. Ensure compression does not cut off circulation (no colour change in toes, no increased pain).
Elevation
Keep the foot above heart level for 24-48 hours to reduce oedema by promoting venous and lymphatic drainage.
What Are the Rehabilitation Phases for an Ankle Sprain?
Proper rehabilitation is structured in four overlapping phases, each with specific goals and progressions. Skipping phases or progressing too quickly increases re-injury risk.
Phase 1: Acute Phase (Days 1-3)
Goal: Protect the ankle, manage pain and swelling, restore pain-free range of motion.
- Alphabet exercises: Write uppercase letters A-Z with your foot using ankle motion; improves ROM without impact
- Isometric peroneal activation: Press foot outward against resistance without moving (holds 5 seconds, 10 reps, 3 times daily)
- Gentle calf stretching: Hold 30 seconds, 3 times, only to mild tension
- Quadriceps and hamstring isometrics: Maintain lower-limb strength without ankle stress
Phase 2: Early Functional Phase (Days 3-14)
Goal: Restore weight-bearing, begin closed-chain strengthening, introduce proprioceptive training.
- Progressive weight-bearing: Day 3-5, use crutches or walker; day 5-7, partial weight-bearing without aids; by day 10-14, full weight-bearing without pain
- Mini-squats: 10-15 reps, 2-3 times daily; keeps knee bent 30-45 degrees, controlled descent
- Calf raises (bilateral): Hold rail, rise onto toes for 2 seconds, lower slowly; 15 reps, 2 sets
- Proprioceptive training—firm surface: Single-leg stance on one foot, 30 seconds, 3 times daily; if unbalanced, use wall or rail
- Resistance band dorsiflexion/plantarflexion: Yellow band, 12-15 reps each direction, 2 sets; strengthens tibialis anterior and peroneal muscles
Phase 3: Intermediate Strengthening Phase (Weeks 2-6)
Goal: Build strength and proprioceptive confidence, tolerate dynamic loading, begin sport-specific movements.
- Lateral hops: Small hops side-to-side on the injured foot, 5-10 hops, rest, repeat 3 times
- Wobble board proprioception: Stand on an inflatable or BOSU ball, 60 seconds, progress to eyes closed; balance challenges proprioceptors
- Single-leg calf raises: Hold rail, rise onto toes on one foot for 3 seconds; 12-15 reps, 3 sets; critical strength test for return-to-sport
- Star Excursion Balance Test (SEBT): Stand on one leg, reach forward/side/back with opposite leg, return to centre; 8 directions, 2 sets; measures dynamic balance and proprioception
- Direction-change drills: Walk forward, then sideways, then backward in controlled patterns; begin with straight lines, progress to 45-degree angles
Phase 4: Return-to-Sport Phase (Weeks 6-12)
Goal: Match sport-specific demands, achieve pain-free functional criteria, restore confidence in movement.
- Sport-specific drills: If basketball: lateral cuts at 50% speed, progressing to 75%, then 100%; if soccer: ball control drills with direction changes; if running: figure-8 drills and hill work
- Agility ladder drills: Forward feet, lateral steps, crossover steps; improves foot speed and proprioceptive coordination
- Plyometric progression: Single-leg hops for distance, single-leg bounding, lateral bounding; only after achieving pain <2/10 with other exercises
- Functional testing (Return-to-Sport Criteria):
- Pain <2/10 during dynamic activities and hopping
- Single-leg calf raise ≥20 reps on injured leg
- Anterior Drawer Test asymmetry <10% (90% symmetry with uninjured side)
- Confidence in movement ≥8/10 subjective rating
- Sport-specific skill testing at game speed without pain or hesitation
Why Do Ankle Sprains Keep Coming Back?
In plain language: Roughly 40% of lateral ankle sprains progress to Chronic Ankle Instability if not adequately rehabilitated, combining mechanical instability with sensorimotor control deficits. People report recurrent giving way, chronic swelling, and hesitation on uneven ground. The fix is neuromuscular training: proprioceptive programmes have reduced recurrent sprains by 35% over a year and recurrence by up to 52%.
One of the most concerning outcomes of ankle sprain is the development of Chronic Ankle Instability (CAI). Research by Gribble et al. (J Athletic Training 2016; PMID 27501368) found that 40% of lateral ankle sprains progress to CAI if not adequately rehabilitated. CAI is characterised by two components: mechanical instability (residual ligament laxity and proprioceptive deficit) and functional instability (sensorimotor control deficits).
Patients with undertreated sprains report recurrent "giving way" episodes, chronic swelling, and hesitation during sport or uneven walking. The good news: neuromuscular training is highly effective. Hupperets et al. (BMJ 2009 · Free PDF; PMID 19542566) demonstrated in a randomised controlled trial (n=522) that an 8-week proprioceptive training programme reduced recurrent ankle sprains by 35% over 12 months. Gribble's research showed neuromuscular training reduces recurrence by 52%.
Proprioceptive Training for CAI Prevention
Proprioceptive training should be continued beyond Phase 4. Progressions include:
- Balance beam or line walking: Walk along a line for 10 metres on firm surface, progress to soft foam
- Electromyographic (EMG) biofeedback: Real-time feedback of peroneal muscle activation helps retrain muscles to respond automatically to ankle threats
- Complex closed-chain drills: Lateral band walks, monster walks, and crossover steps on unstable surfaces
- Reaction drills: Random perturbations (trainer applies unexpected directional force) train rapid proprioceptive response
Is Taping or a Brace Better for an Ankle Sprain?
Athletic tape and ankle braces are proven preventive strategies and adjuncts to rehabilitation. Rigid athletic tape (zinc oxide-based) provides mechanical support and proprioceptive feedback via cutaneous mechanoreceptors. Robbins and Waked (Am J Sports Med 1998) found that prophylactic ankle taping reduces re-sprain risk by 69% in previously injured athletes.
Functional ankle braces (lace-up, semi-rigid, or bivalved designs) are equally effective for prevention, reducing re-injury by 70%, and have the advantage of durability and ease of application. Neither taping nor bracing should replace proprioceptive training; rather, they work synergistically to stabilise the ankle while neuromuscular systems are re-educated.
When to Use Taping vs Bracing
- During rehabilitation: Semi-rigid brace or prophylactic tape during exercise
- Return-to-sport (Phase 4): Taping or brace during sport, combined with proprioceptive exercises
- Prevention (previously injured): Prophylactic bracing/taping for high-risk activities (court sports, running on uneven terrain)
- Long-term: Proprioceptive training allows gradual reduction of external support as proprioceptive confidence improves
Red Flags: When to Seek Urgent Care
Stop rehabilitation and seek medical evaluation if you experience:
- Proximal fibula pain after inversion injury: Suggests possible Maisonneuve fracture (proximal fibula fracture associated with ankle sprain). Requires X-rays of both ankle AND knee.
- Positive Ottawa Ankle Rules: Posterior third of lateral malleolus tenderness + inability to bear weight = X-ray indicated
- Bilateral ankle sprains: Different mechanisms (e.g., one inversion, one eversion) warrant screening for ankle laxity or neuromuscular disorder
- Recurrent sprains with minimal trauma: May indicate generalised ligamentous laxity or syndesmotic involvement
- Severe pain + ankle firmness + diminished foot pulses: Red flag for compartment syndrome; requires emergency assessment
- No functional improvement by week 2: May indicate Grade III sprain, syndesmotic involvement, or osteochondral lesion
Important note: Full recovery from ankle sprain takes longer than most people expect. Van Rijn et al. (BJSM 2008) found that 72% of ankle sprain patients still had symptoms at 1 year, and only 36% had fully recovered at 3 months. This shows the critical importance of completing structured rehabilitation rather than relying on rest alone.
A core part of that structured rehab is retraining balance and proprioception. See the full evidence-based protocol — how much balance training you need after an ankle sprain (dosage & progression).
Functional Testing and Return-to-Sport Criteria
Clearing an athlete to return to sport should never be based on calendar days alone. Functional testing ensures the ankle has regained sufficient strength, proprioception, and confidence to tolerate sport-specific demands without re-injury.
Objective Tests:
- Single-Leg Calf Raise: 20+ consecutive rises on injured leg without upper-body movement = adequate plantarflexor strength
- Star Excursion Balance Test (SEBT): Reach asymmetry <4cm between legs = adequate proprioception and dynamic balance
- Y-Balance Test: Anterior, posteromedial, posterolateral reach symmetry ≥90% = functional lower-limb stability
- Single-Leg Hop Test: Pain-free hopping with distance ≥90% of uninjured leg = adequate power and proprioception
- Anterior Drawer Test: Asymmetry <10mm = mechanical stability adequate for sport demands
Subjective Criteria:
- Pain ≤2/10 during sport-specific drills at full speed
- Confidence in ankle ≥8/10 during dynamic cutting and landing
- No swelling or giving-way episodes during Phase 4 training
Frequently Asked Questions
How do I know if I've broken my ankle or just sprained it?
The Ottawa Ankle Rules help distinguish fractures from sprains with 100% sensitivity. If you can bear weight immediately after injury and have no tenderness at the ankle bone tips (lateral and medial malleoli), a fracture is unlikely. However, if you cannot bear weight, have severe localised bone tenderness, or heard a crack, seek X-rays. Swelling alone does not indicate a fracture—both fractures and severe sprains swell significantly.
Should I rest completely or keep moving?
The POLICE protocol recommends movement as tolerated after the first 48-72 hours, not complete rest. Research shows functional rehabilitation (early controlled movement) results in 7 days faster return to activity compared to immobilisation, with better ankle range of motion at 3 months. Complete rest causes stiffness, muscle atrophy, and proprioceptive deficits. Start with pain-free movement (alphabet exercises, gentle ankle circles) and progress to weight-bearing activities as swelling permits.
Why does my ankle keep spraining?
Untreated or undertreated ankle sprains lead to Chronic Ankle Instability (CAI) in 40% of cases due to residual proprioceptive deficits and ligament laxity. If your ankle repeatedly "gives way" with minimal trauma, you have mechanical instability (loose ligaments) or functional instability (poor proprioceptive control). Neuromuscular training—specifically proprioceptive exercises and peroneal strengthening—reduces recurrence risk by 52%. Completing structured rehabilitation is essential to prevent chronic instability.
How long before I can return to sport?
Return-to-sport timelines depend on grade: Grade I typically 1-2 weeks, Grade II 3-6 weeks, Grade III 6-12 weeks. However, calendar days matter less than functional criteria. You must pass objective tests (single-leg calf raise ≥20 reps, pain <2/10 with hopping, 90% strength symmetry, positive proprioceptive tests) before returning to full sport. Rushing return without meeting criteria significantly increases re-injury risk.
Is ankle taping better than a brace?
Athletic taping and functional ankle braces are equally effective for prevention, each reducing re-sprain risk by approximately 69-70%. Neither should replace proprioceptive training. Taping may feel more secure but requires daily reapplication and loses elasticity. Braces are more convenient and durable. During rehabilitation, a semi-rigid brace provides support while allowing movement; during return-to-sport, either taping or bracing combined with proprioceptive exercises works well. Choose based on personal preference and sport demands.
See Also: Related Conditions and Resources
Before you book — 3 things worth checking
Ready to Recover Your Ankle?
Don't let an untreated ankle sprain become chronic instability. Our physiotherapists will assess your ankle, grade your sprain, and guide you through evidence-based rehabilitation. Whether Grade I or III, we'll help you return to sport safely and confidently.